Strengthening My Pixel Art Technique 【 🇪🇸 - 🇺🇸 】
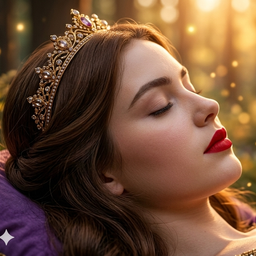
Saludos gente linda de #DIYHub. Hoy quise poner en práctica la técnica del arte pixelado para traerles mejores dibujos y diseños. Empecé haciendo corazones, pero desde que hice al Alien, he querido probar algo diferente y pues, en esta ocasión hice un rostro de mujer. Para ello usé una imagen guía que obtuve de Pinterest:
Greetings, lovely people of #DIYHub. Today I wanted to put the pixel art technique into practice to bring you better drawings and designs. I started by making hearts, but ever since I made the Alien, I've been wanting to try something different, so this time I made a woman's face. To do this, I used a guide image I got from Pinterest:
ℙ𝕒𝕤𝕠 𝕒 ℙ𝕒𝕤𝕠 ┇ 𝕊𝕥𝕖𝕡 𝕓𝕪 𝕊𝕥𝕖𝕡
Mi cuaderno cuadriculado es de 30 cuadrículas de alto por 34 cuadrículas de ancho. No es un cuaderno cuadriculado normal, en realidad viene a ser como una agenda de notas pero como nunca la usé, lo estoy haciendo ahora para mi arte en pixeles. Les digo esto porque tuve que reducir un poco la imagen para poder hacerla.
My grid notebook is 30 grids high by 34 grids wide. It's not a normal grid notebook; it's actually like a notebook, but since I've never used one, I'm using it now for my pixel art. I'm telling you this because I had to scale the image down a bit to be able to create it.
La reducción del dibujo original la hice a lo alto. Quitando 2 espacios, uno de cada lado. En sí el dibujo tenía 30 líneas de alto y 34 de ancho, pero como yo quise agregarle un margen para darle un toque más prolijo, tuve que restarle una línea a cada extremo. Y bueno, como ven, lo primero que hice fue el marco.
Ya luego decidí hacer el dibujo de izquierda a derecha, de forma vertical. Ya que las líneas negras estaban más largas a lo alto que a lo ancho. Para ahorrarles espacio, colocaré la secuencia del dibujo por cada línea dibujada verticalmente. En total fueron 29 líneas y se empieza desde la segunda línea.
I reduced the original drawing to the height, removing two spaces, one on each side. The drawing itself was 30 lines high and 34 lines wide, but since I wanted to add a margin to make it look neater, I had to subtract one line from each end. So, as you can see, the first thing I did was the frame.
I then decided to draw from left to right, vertically, since the black lines were longer in height than in width. To save space, I'll include the drawing sequence for each line drawn vertically. There were 29 lines in total and it starts from the second line.
| 2 | 3 | 4 |
|---|---|---|
| 5 | 6 | 7 |
| 8 | 9 | 10 |
| 11 | 12 | 13 |
Aquí se podría decir que vamos a la mitad del dibujo y ya se empieza a ver la forma del rostro o al menos parte de la nariz y de la boca.
Here we could say that we are halfway through the drawing and we are already beginning to see the shape of the face or at least part of the nose and mouth.
| 14 | 15 | 16 |
|---|---|---|
| 17 | 18 | 19 |
| 20 | 21 | 22 |
| 23 | 24 | 25 |
| 26 | 27 | 28 |
Ya en este punto sólo falta la última línea. Como pueden notar, la pupila de la chica quise hacerla diferente, no en negro. Su cabello sería verde así que quería que su ojo también fuera del mismo color pero jugando con diferentes tonalidades de verde claro. La última línea del dibujo se ve así:
At this point, only the last line is missing. As you can see, I wanted to make the girl's pupil different, not black. Her hair would be green, so I wanted her eye to also be the same color, but with different shades of light green. The last line of the drawing looks like this:
Y antes de mostrarles el resultado final de mi dibujo, quiero hacerles una recopilación de todos los pasos en un Gif que creé usando Google Fotos. Como ya saben, al tomar tantas fotos de cada línea, me gusta mostrar el trabajo continuo como si fuera una especie de mini película. Espero que lo disfruten.
And before showing you the final result of my drawing, I want to summarize all the steps in a GIF I created using Google Photos. As you know, by taking so many photos of each line, I like to show the ongoing work as a sort of mini-movie. I hope you enjoy it.
Y bueno en algunas franjas negras notarán un pequeño sobresaliente de negro pero es porque se me corrió el marcador usando la regla y como es punta redonda y está nuevo, parece que pinta demasiado y no lograba controlar el flujo de la tinta. A pesar de eso, continué dibujando y el resultado final me gustó bastante. Ya despues de tenerlo listo todo en negro, sólo me quedaba colorearlo.
And well, in some black stripes, you'll notice a small black highlight, but that's because I smudged the marker while using the ruler. Since it's a round-tipped marker and new, it seemed to paint too much, and I couldn't control the flow of the ink. Despite that, I continued drawing, and I quite liked the final result. Once I had everything ready in black, all that was left was to color it in.
ℝ𝕖𝕤𝕦𝕝𝕥𝕒𝕕𝕠 𝔽𝕚𝕟𝕒𝕝 ┇ 𝔽𝕚𝕟𝕒𝕝 ℝ𝕖𝕤𝕦𝕝𝕥
Al colorearlo quise jugar con las luces y sombras pero no lo logré muy bien. Al principio creía que lo estaba logrando con los tonos en verde pero me confundí con los marcadores y bueno, quedó así. Espero poder seguir practicando para traerles diseños propios sin necesidad de usar dibujos guías.
Ahora, déjenme saber en los comentarios ¿qué les pareció mi trabajo? ¿Les gustó mi paso a paso? ¿lo intentarían? los estaré leyendo en los comentarios! ¡Hasta mi siguiente post! 🌸
When coloring it, I wanted to play with light and shadow, but I wasn't quite successful. At first, I thought I was getting it right with the green tones, but I got confused with the markers, and well, it ended up like this. I hope to keep practicing so I can bring you your own designs without having to use guide drawings.
Now, let me know in the comments what you think of my work? Did you like my step-by-step instructions? Would you try them? I'll be reading them in the comments! See you in my next post! 🌸
| Imagen usada como Guía 【Image used as a Guide】 |
| Las Fotos Utilizadas a lo largo del Post son de mi galería 【Photos used throughout the post are from my gallery】 |
| Cámara del Teléfono Redmi Note 9A 【Redmi Note 9A Phone Camera】 |
| Edición hecha con 【Edited with】Canva |
| Traducción hecha con 【Translation made with】Traductor Google Translate |
Leave Strengthening My Pixel Art Technique 【 🇪🇸 - 🇺🇸 】 to:

Best Posts From 𝙿𝚊𝚗𝚗𝚊𝚟¡ 💜
We have not curated any of pannavi's posts yet. But you can encourage our curation team to review posts by visiting them regularly and by referring other readers. Because we give priority to frequently read content.
More Posts From 𝙿𝚊𝚗𝚗𝚊𝚟¡ 💜
- 🌟 My deck turned to gold! 🌟 I bought 4 new golden cards!
- ¿Mandalas en HD? Mejor en Pixel Art.【 🇪🇸 - 🇺🇸 】
- Nobody dies today! Saving the game in Wild Rift with Soraka【 🇪🇸 - 🇺🇸 】
- Am I improving or just getting lucky? My current experience in Mobile Legends【 🇪🇸 - 🇺🇸 】
- The art of winning (and how to lose gracefully) in Splinterlands【 🇪🇸 - 🇺🇸 】
- Maul Shadow Lord: The unforgettable echo of the Dark Side.【 🇪🇸 - 🇺🇸 】
- Poema: Como la Luz de Estrella【 🇪🇸 - 🇺🇸 】
- Boosting Battle Power: My New Gold and Common Acquisitions【 🇪🇸 - 🇺🇸 】
- 🍌 The unbeatable power of the banana 🍌: Victory with Soraka Support in Wild Rift【 🇪🇸 - 🇺🇸 】
- The internet has already seen it, but I'm still recovering from the Infinite Castle.【 🇪🇸 - 🇺🇸 】